I was FINALLY able to go into my classroom and really get some work done!!
*(I switched rooms with a fellow K- teacher at
the end of the year, much work was needed)
the end of the year, much work was needed)
Fortunate enough, I had awesome & amazing help during the last 3-contract days of the school year...so all the work of organizing and placing things in the cupboards was thankfully done. But that left everything else in making the classroom come together....moving around furniture and setting everything out; and making it kid accessible and 'my own'.
My classroom that I came to on Monday.....
So happy that the cupboards are organized...to.a.T
Ready, Set, CLASSROOM!
5 hours later....below is a full preview of part of the room.
Classroom picture display... :)
Leaving the classroom to return on Thursday (today)
From 12:30-5:30 (today) I was able to get A LOT done in a relaxing manner.
Below are a few snapshots...
File Folder rack is a dishwasher rack purchased at $1 store :)
Thank you mommy & Kohl's for the Eric Carle donations!!
Letter Line...complimentary idea from my dear friend Heather.
Work on Writing...still a work in progress
I am really happy with how this is coming together
(Peg board is for 'some' Word Work supplies)
****A goal of mine this year is to utilize all classroom space
Right when you walk into the classroom...
Writing Samples will be displayed here
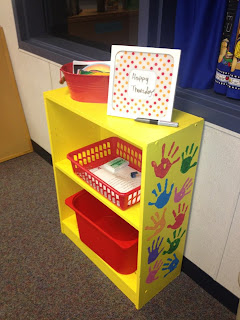
Entrance to the classroom...
The shelf was made with my 1st Kindergarten class :)
(They signed the bottom shelf, covered by the bucket)
Contents:
*Picture frame: used for wipe of message
*Red bucket: last minute notes
*Red basket: notes & such to go home
*Red bucket: student take home folders
New thing this year...Math Wall
(mock set-up)
*The clothespin was yet another Pinterest project completed:
-Push pins
-Clothespins
-Hot glue gun
What a lovely day in the classroom utilizing everyday office supplies to use in my classroom!!


